SimServer How To #3: Simulate data changes on a server using an OPC UA client
In the previous article: SimServer How To #2, we showed you how to replicate a real-life OPC UA server by importing a NodeSet into the Prosys OPC UA Simulation Server and simulating instances.
In some cases, in addition to simulating instances on the server, it would be beneficial to make the values on the server change according to specific patterns or recorded data. This way, you can simulate the physical system from which the server supposedly gets its data; think of robots or other factory floor devices.
Currently, our Simulation Server doesn’t have built-in functionalities for this task, so we are here to walk you through two possible solutions:
- Manually change values using Prosys OPC UA Browser.
- Create your own OPC UA client using Prosys OPC UA SDK for Java to change values on your server automatically.
Both tutorials can work as stand-alone examples because you can use a free, freshly installed version of Prosys OPC UA Simulation Server. You will need the Professional Edition of the Simulation Server if you want to continue from where we left off in the previous tutorial.
Manually change values using Prosys OPC UA Browser
For this part, you will need the following products:
- Prosys OPC UA Simulation Server
- The free version is enough for a simple example.
- You will need the Professional Edition to continue with the example from the previous tutorial. Still, if you don’t have it yet, you can get an evaluation license by contacting our sales team.
- Prosys OPC UA Browser
NOTE: To follow with the free edition of Simulation Server, skip steps 5-8.
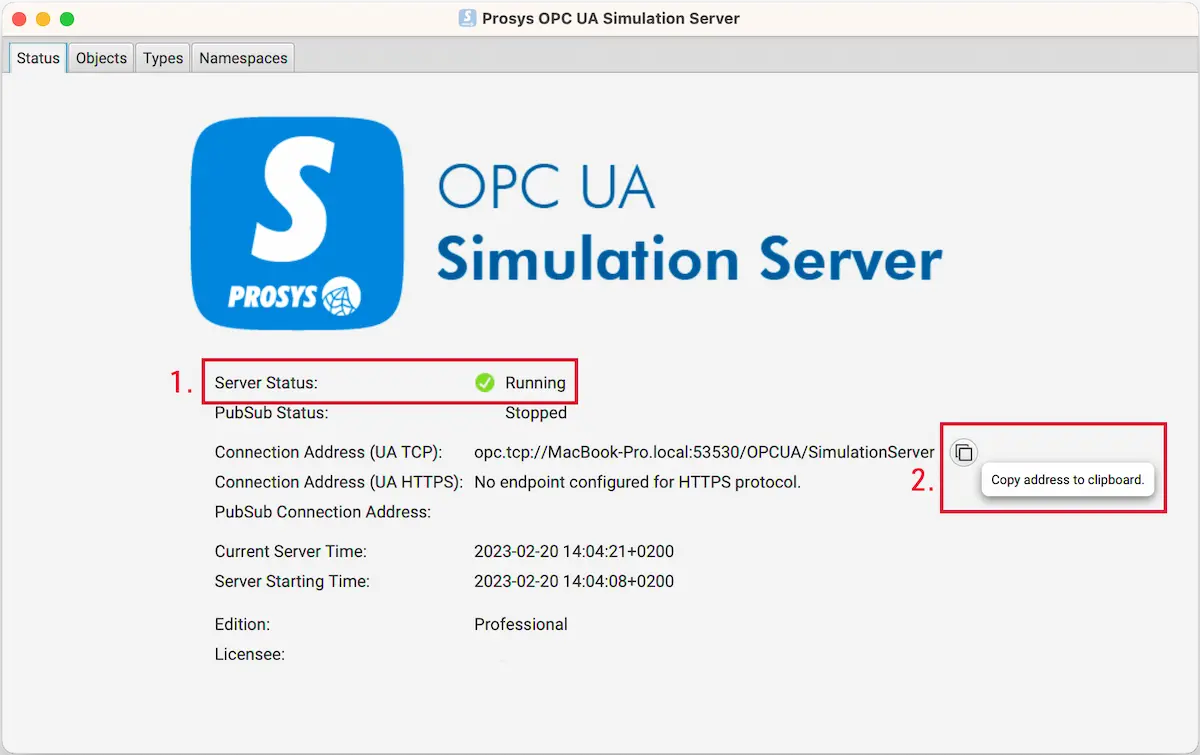
- Make sure your server is running.
- Copy the connection address. (This is optional; you can also manually type the server’s address.)
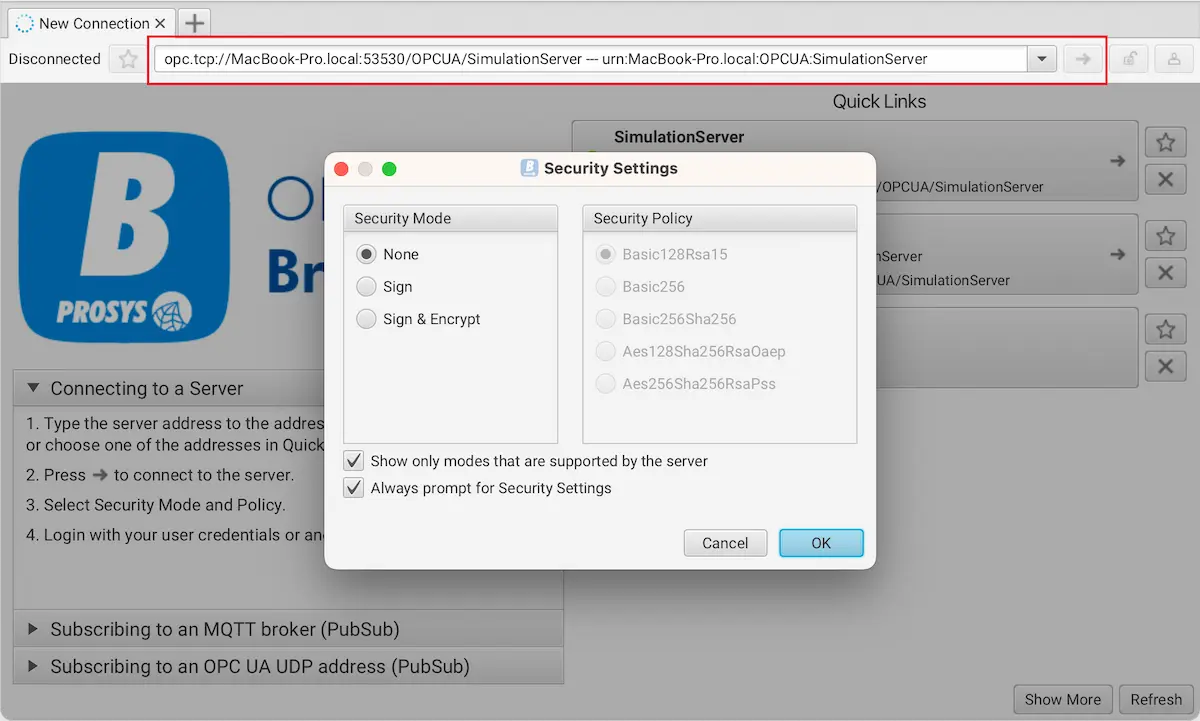
3. Launch Prosys OPC UA Browser and paste the connection address to the address bar on the top. Press Enter or click the arrow (→) on the right side of the address bar to start connecting.
4. Define your preferred security settings. When testing with Simulation Server, we can get away with using None and Anonymous, but these are not recommended settings for real OPC UA communication.
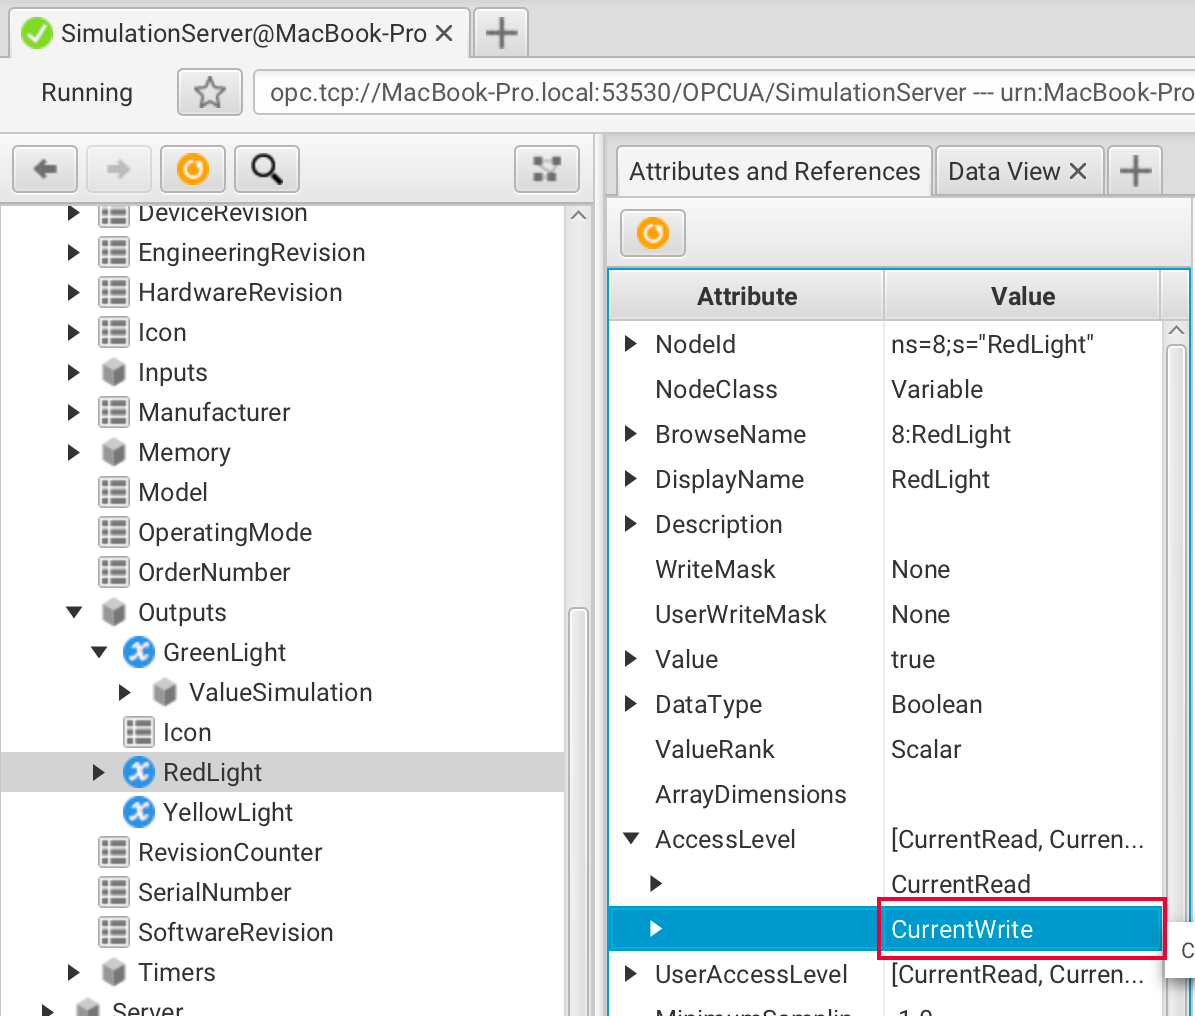
5. Browse the Address Space to find the variable whose value you want to change. We changed the light output variables in the previous tutorial, so let’s play with them again. We select Objects > PLC_1 > Outputs > RedLight. It is essential to find a variable with CurrentWrite listed in its AccessLevel because that means you can write values for that variable.
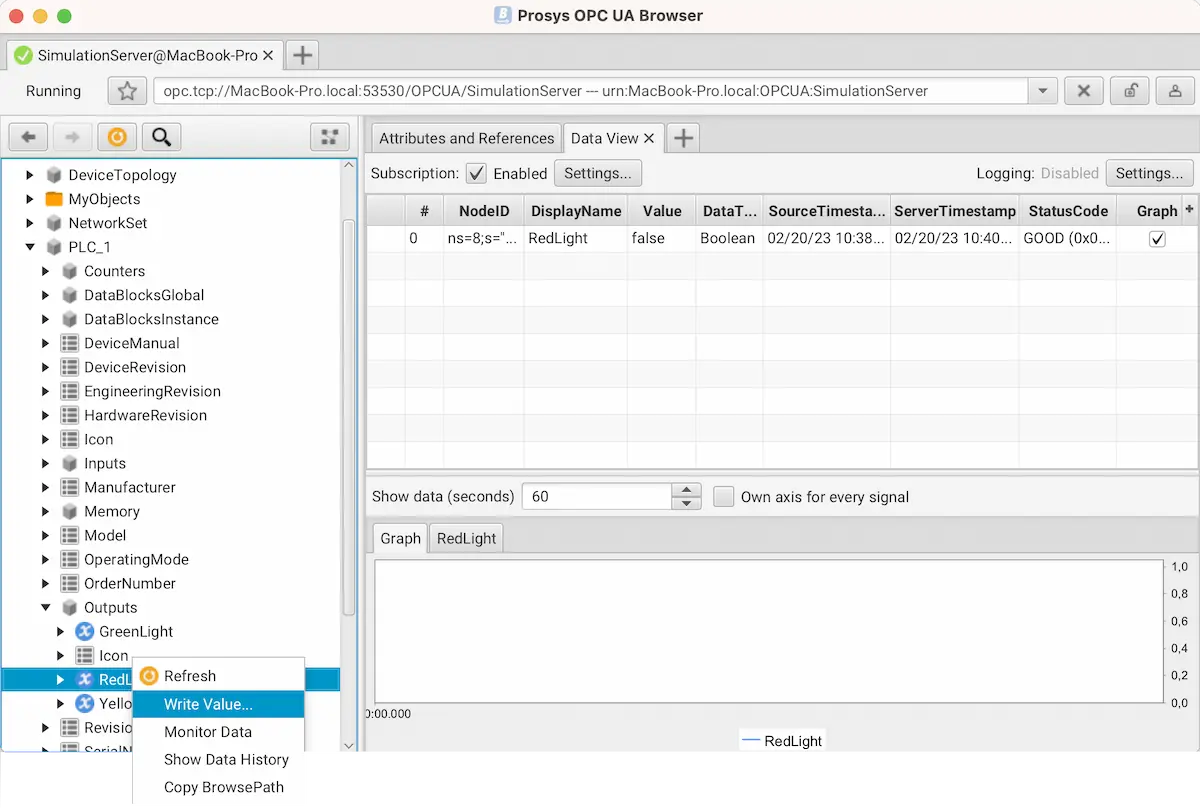
6. Right-click on the selected variable and select Write Value.
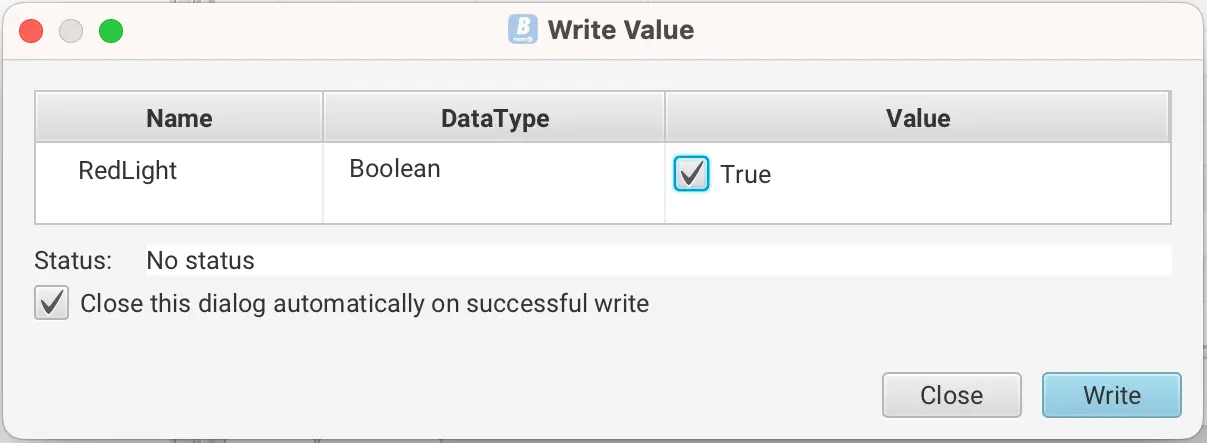
7. In the Write Value dialog, you can set a new value for the variable. Since RedLight is a boolean variable, we can only write True or False, depending on its current value. Tick the value box to write True and click on Write. If the write was successful, the dialog closes, and the new value should be visible for that variable.
8. If you right-click on the variable and select Monitor Data, you can observe the value as it changes. You can see the values drawn in a graph by ticking the Graph option on the right side of the Data view. This is how the graph looks like for RedLight after a few writes.

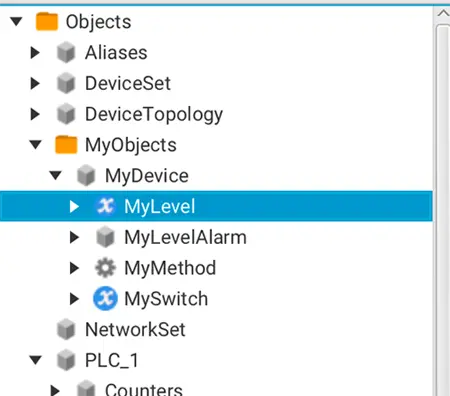
9. Let’s try a more exciting example. Select Objects > MyObjects > MyDevice > MyLevel. Right-click and select Write Value.
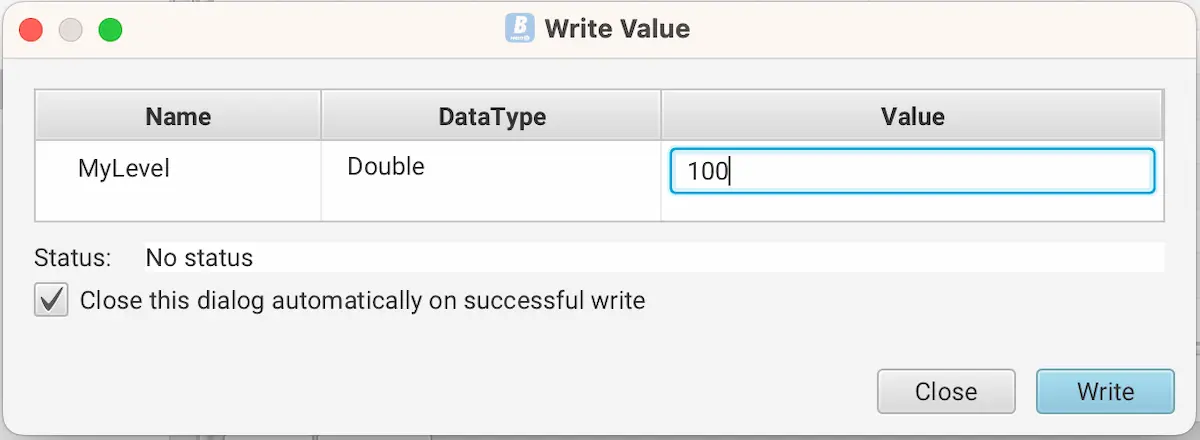
10. From the DataType, we can see that this variable has double values, so we can write numbers for this one. We’ll write 100 and click on Write.
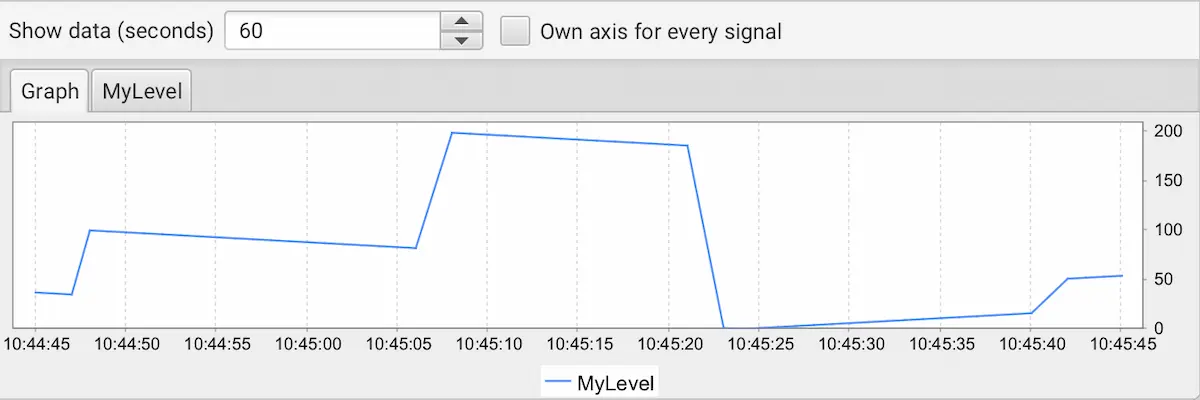
11. MyLevel is a variable that has a simulated value, so it gets updated by the server. We can still write new values to it, and the following graph shows how this changes the simulated values.
Create your own OPC UA client using Prosys OPC UA SDK for Java to change values on your server automatically
For this part, you will need the following products:
- Prosys OPC UA Simulation Server
- The free version is enough for a simple example.
- You will need the Professional Edition to continue with the example from the previous tutorial. You can get an evaluation license by contacting our sales team if you don’t have it yet.
- Prosys OPC UA SDK for Java
- You can get the evaluation license for this tutorial through our download request form.
- To follow this tutorial, you must first set up your SDK development environment. Follow the “Prosys OPC UA SDK for Java Starting Guide” that you can find on the product’s download page.
- Prosys OPC UA Browser
- This is not required, but you can easily monitor updated values.
- Eclipse or another Java development environment
NOTE: If you are working with the free version of Simulation Server, skip steps 11-13.
- Make sure your SDK for Java is ready for development. Follow the “Prosys OPC UA SDK for Java Starting Guide” that you can find on the product’s download page to set everything up correctly.
- Launch the server and browse the address space in the Address Space view and find the following details about the variable you want to write to:
- NamespaceIndex (a)
- The string value of the NodeId’s Identifier (b)

3. For this tutorial, we selected two variables and found out their details:
- Objects > MyObjects > MyDevice > MyLevel
- NamespaceIndex: 6
- NodeId’s Identifier: MyLevel

- Objects > PLC_1 > Outputs > RedLight
- NamespaceIndex: 8
- NodeId’s Identifier: “RedLight” (note that the double quotation marks must be present in the code as well!)

4. Go to Eclipse and the project you have already set up.
5. Right-click on the com.prosysopc.ua.samples.client package and add a new class by selecting New > Class.
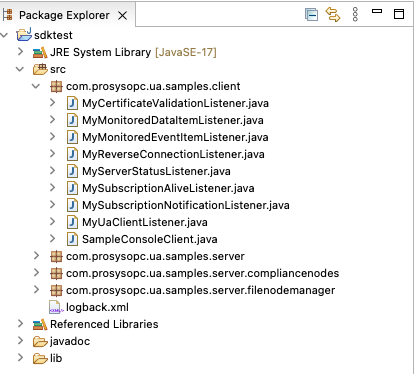
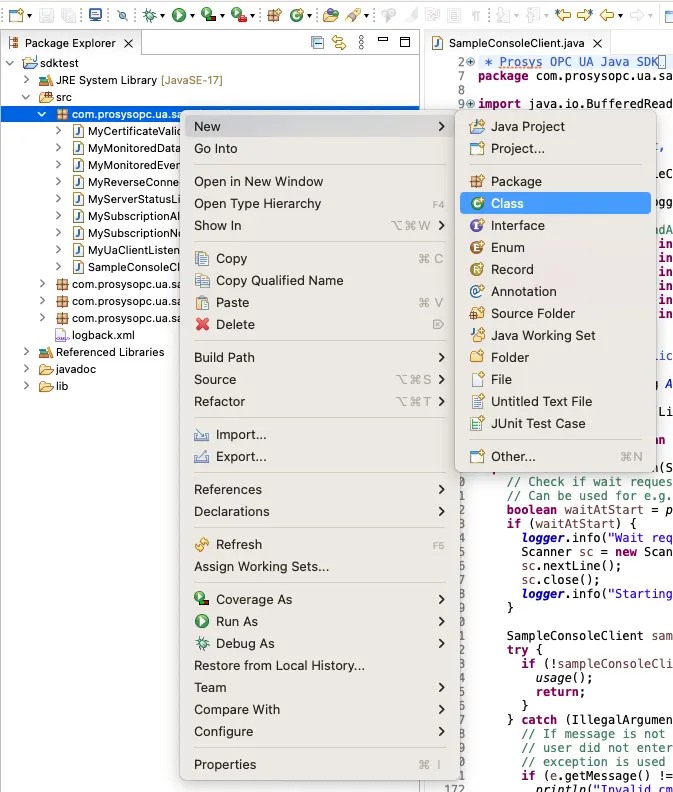
6. Give a name to the new class and click Finish. We will name the class “SimpleClient”.
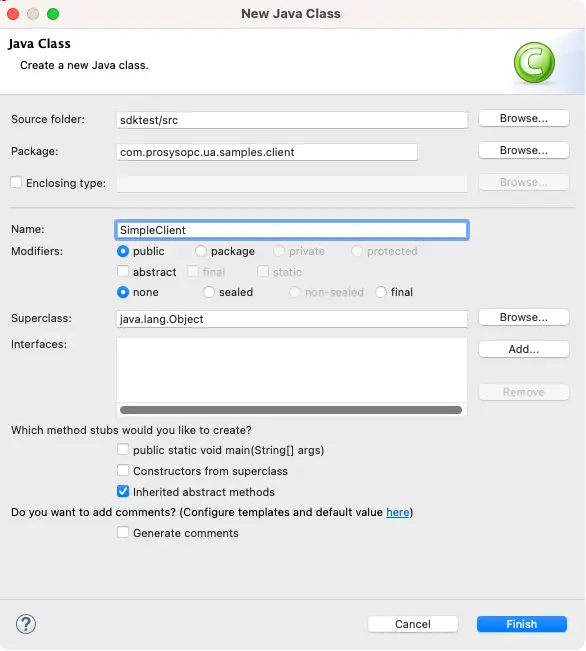
7. Paste the following code blocks into your class.
First, the imports for your class:
					  import java.io.IOException;
  import java.net.UnknownHostException;
  import java.util.Locale;
  import com.prosysopc.ua.ApplicationIdentity;
  import com.prosysopc.ua.SecureIdentityException;
  import com.prosysopc.ua.client.UaClient;
  import com.prosysopc.ua.stack.builtintypes.DataValue;
  import com.prosysopc.ua.stack.builtintypes.LocalizedText;
  import com.prosysopc.ua.stack.builtintypes.NodeId;
  import com.prosysopc.ua.stack.builtintypes.UnsignedInteger;
  import com.prosysopc.ua.stack.core.ApplicationDescription;
  import com.prosysopc.ua.stack.core.ApplicationType;
  import com.prosysopc.ua.stack.transport.security.SecurityMode;
The rest of the code that goes inside the class:
					  public static void main(String[] args) throws Exception {
     UaClient client = new UaClient("opc.tcp://localhost:53530/OPCUA/SimulationServer");

     // These are the variables that the user needs to change, default variables can be used to test how the code works.
     NodeId writeTestNodeId = new NodeId(6, "MyLevel");
     int sleeptime = 1000;
     Double[] writeValues = {-1.0, -3.0, -5.0, -7.0, -9.0};

     client.setSecurityMode(SecurityMode.NONE);
     initialize(client);
     client.connect();
     DataValue value;

     // Simple loop that goes through the predetermined list of values to write to the variable
     for (int i = 0; i < writeValues.length; i++) {
        // valueOf(13) is hard coded because it is the attributeId of value-attribute.
        client.writeAttribute(writeTestNodeId, UnsignedInteger.valueOf(13), writeValues[i], true);
        value = client.readValue(writeTestNodeId);
        System.out.println(value.getValue()); // Prints the values that were written
        Thread.sleep(sleeptime);
     }
     client.disconnect();
  }

  protected static void initialize(UaClient client) throws SecureIdentityException, IOException, UnknownHostException {
     ApplicationDescription appDescription = new ApplicationDescription();
     appDescription.setApplicationName(new LocalizedText("SimpleClient", Locale.ENGLISH));
     appDescription.setApplicationUri("urn:localhost:UA:SimpleClient");
     appDescription.setProductUri("urn:prosysopc.com:UA:SimpleClient");
     appDescription.setApplicationType(ApplicationType.Client);
     final ApplicationIdentity identity = new ApplicationIdentity();
     identity.setApplicationDescription(appDescription);
     client.setApplicationIdentity(identity);
  }
The above code has a few crucial parts, so let’s go through them.
The function initialize() is used to initialize the client. If you did not name your class “SimpleClient”, you must modify the following lines to match your class name:
					  appDescription.setApplicationName(new LocalizedText("SimpleClient", Locale.ENGLISH));
  appDescription.setApplicationUri("urn:localhost:UA:SimpleClient");
  appDescription.setProductUri("urn:prosysopc.com:UA:SimpleClient");
This line creates a client that is used to connect to a server. The URL should be your server’s connection address.
UaClient client = new UaClient("opc.tcp://localhost:53530/OPCUA/SimulationServer");
The variable for which we want to update values is set on the following line. This is where we need the NamespaceIndex and Identifier we found in steps 2 and 3.
NodeId writeTestNodeId = new NodeId(6, "MyLevel");
Since MyLevel’s data type is double, we can create a list of values that will be written to the variable one by one. You can also retrieve a list of values from a file for this.
Double[] writeValues = {-1.0, -3.0, -5.0, -7.0, -9.0};
Finally, this line is used to write the values to the server:
client.writeAttribute(writeTestNodeId, UnsignedInteger.valueOf(13), writeValues[i], true);
9. Right-click on your class and select Run As > Java Application.
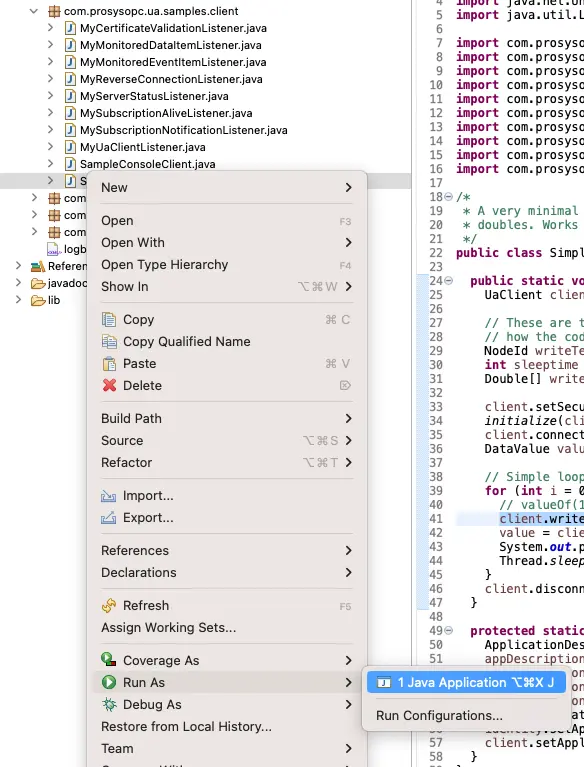
10. The code should run and print the written values on your console.

11. Now we can write values to RedLight. Modify the NodeId and list of values to fit the variable with boolean values.
The new code lines look like this:
NodeId writeTestNodeId = new NodeId(8, "\"RedLight\"");
Boolean[] writeValues = {false, true, false, true, false, true};
12. Run the client application again (step 9) and observe the console.
13. If you had Browser running and were monitoring the variable, you could see the changes in the value.

Next Steps
In this article, we have shown you two ways to write values to variables on your OPC UA server. Prosys OPC UA SDK for Java enables you to do much more, so if you are interested in learning more about programming your own OPC UA client, we recommend that you look at the tutorials and sample files that came with your SDK download.
If you want to start developing your own client or server but are confused and want more details, don’t hesitate to contact us for help by email at sales@prosysopc.com or through our website contact form. We offer workshops and other materials to get you started.
Author Info

Kaisa Hirvola
Creative Engineer, Prosys OPC
Email: kaisa.hirvola@prosysopc.com

